 If you are a teacher, or if you were ever in elementary school, you have probably heard of the game 4 corners (If you don’t know what it is, don’t worry; I’ll explain). Usually, 4 corners is used as an easy indoor recess when you get that dreaded announcement over the intercom that it has somehow snowed 10 feet and you’ll have to keep your students inside. And, in my class because I had to do indoor recess once every day, I would use 4 corners frequently. However, I also used it to teach, and I’ll show you how.
4 corners is a great way to get your students moving and engaged without them even realizing that they are learning. You can use it as a practice game, or you can use it to get students’ opinions, or even as a fun way to introduce debates. Here is how to use it:
The great thing about this activity is that not only is it very engaging, but it is so easy to change up. You can change it to 2, or even 3 corners to fit your multiple choice questions. You can even let students who are behaving well decide how to travel to the corners, such as skip, crab walk, etc. You can also make it a competition if you want. Simply have students sit down if they get the answer wrong. They can still answer the questions, just they can’t leave their desk. The last one standing wins. Or, if you don’t want to compete, just let your students keep playing even if they get the answer wrong. Now you might be thinking, “Oh, well my students will just change their answers when they see other people’s answers.” Or maybe, “My students will make fun of students that get the answer wrong.” But, if you establish clear rules the first time, you won’t have these issues. So here are the expectations I set with my students.
Teaching these simple expectations at the beginning will save you in the long run. Help your students to understand that this activity is a privilege. And if you students don’t follow the expectations, stop. Showing them that you expect them to follow the rules is much more important than trying to be a “fun” teacher and letting them do the activity anyway. So, as you can see, this is so easy to use for any subject. If you try this in your class, let me know how it works for you. Happy planning! Mackenzie  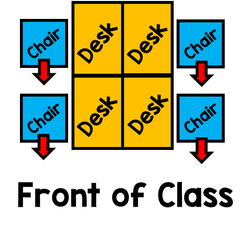 “It’s so much easier to manage students when they are at the rug.” I’ve overheard this several times in the workroom and at professional developments, but I think that this is only partially true. So, I wanted to take some time to address this.
Yes, there are some advantages to having your students at the class rug. They are all in one spot, you can easily see them, and they don’t have anything with them to distract them. But, there are also downsides to it. It’s more difficult to move around and use proximity when the students are sitting so close together. And, it doesn’t work well if you need the students to be doing any writing. You have to have the students get their pencils and clip boards, and then wait for those students who forget to awkwardly climb over their peers and spend forever digging through their desk trying to find their pencil. I would say that it is easier to manage students when they are at the rug for some types of instruction. But, for other times it is just easier to have them at their desks. Don't limit yourself by only teaching at the rug! You can teach your students wherever they are sitting if you just manage them correctly. So, if you are a teacher who avoids having your students stay at their desks while you instruct them, or if have your students stay at their desks but they are out of control, read on. This first tip I have to credit to my amazing coworker who shared this idea with me. It saved my life! Plus, it’s as simple as having your students change the way their chairs face. All you need to do is teach your students these 2 chair positions. (Note: This will not work for all seating arrangements. This is meant for arrangements in which the desks aren’t facing the front of the classroom, such as some table group arrangements.) The first chair position is called learning position. This means having your students turn their chairs and their bodies to face the front of the class, folding their arms, and looking at you. (If you are confused, don't worry. I thought of you and included a diagram to show what in the world I am talking about.) If you have a compatible seating arrangement, this means that your students will have their desk to the side of them. This helps to discourage students from playing with anything because they can’t hide it as easily, plus it is now easy for you to see when their arms aren’t folded. (If you have a student who still plays with things in their desk, turn their desk around so that the desk opening isn’t facing them anymore.) It also makes it so none of the students are facing each other, so they are less likely to talk. Have your students turn into learning position whenever you are instructing them and they don’t need to be writing or doing anything they need a hard surface for at the moment. If you need your students to be able to write during your instruction, then simply have them turn into the second position, which is called working position. All this means is that the students turn out of learning position to face their desk again. This next tip works no matter your seating arrangement, and it is essential to managing your students throughout the day, but especially when they are at their desks. Proximity. I know that you have probably heard this term hundreds of times, but it is key to managing your students when you instruct them at their desks. Walk around the classroom while you instruct. This keeps the kids on their toes because they don’t know when you will walk by them. So, if you notice a student misbehaving, simply walk over to their desk and instruct the class from there. The students won’t think anything of it, but most of the time it corrects their behavior. Lastly, I highly recommend having a table group or row management system. So, if you have your students sitting in table groups or rows, reward the tables that are following directions while you instruct them. It can be as simple as giving them points and then giving a reward to the first table group to get to a certain amount of points. These are just a few ways to help manage your students at their desks, but I know that you fabulous teachers have so many more ideas. If you do, please share your wisdom with all of us and comment below! Happy planning! Mackenzie  With the first day of school drawing nearer, I know many of you are thinking about how you want to manage your class this year. One of the first things I teach my students is the attention signal for our class. As teachers, we already have to talk so much, and having to raise your voice every time you want your students' attention will not only wear out your voice, it will wear out your students. Attention signals are critical to managing your classroom, and if you teach them to your students from the beginning, you will save your sanity in the coming months of the school year.
WHAT IS AN ATTENTION SIGNAL? An attention signal is something you use to get students' attention. It can be a short saying, song, or series of actions such as clapping. Attention signals can be used when your students are working and you need them to stop, when they are not following directions and you need to redirect them, or in any other instance when you need them to be quiet and listen to you. HOW DO YOU CHOOSE YOUR ATTENTION SIGNAL? When deciding what attention signal to use, you want to pick something that will be effective and efficient. Your prompt should actually get your students' attention, and it should be short. Long attention signals take away from valuable instruction time and they can even lose the students' attention in the process. No matter what prompt you choose, always make sure that when you teach it, you also teach your students to stop what they are doing and look at the teacher. I try to pick prompts that have actions integrated to help the students do that. One prompt I use is: Teacher: “Hands on top.” Students: (Put both hands on top of head.) “Everybody stop.” I love this attention signal because it forces the students to put down what they are working on so they aren’t tempted to continue what they are doing. I can also easily tell who is not giving me their full attention. Some other prompts I use are: Teacher: “1, 2, 3, eyes on me." Students: “1, 2, eyes on you.” Teacher: “Macaroni and cheese.” Students: “Everybody freeze.” (Freeze in the position they are in.) Now that you have a better idea of what attention prompts should look like, here are the steps that I use to teach them. STEPS
ONE LAST TIP Don’t have too many attention signals in your classroom. This overloads the students and is unnecessary. At the beginning of the year, I only use one prompt. Eventually, students tire of hearing you say the same thing to get their attention, so make sure you switch it up! If I sense that my students are not responding as well to the prompt later in the year, I teach another one. Then I have a few attention prompts that I can choose from to keep my students on their toes. So, as you get ready for the first day, make sure you think through exactly what you expect your students to do when you give them your signal, and don’t lower your expectations. Your kiddos will get it with practice. If you have an attention signal that works great in your class, please share it in the comments. The more ideas the better! Happy planning! Mackenzie |
AuthorHi! I'm Mackenzie. Teacher, wife, and Washingtonian. Check out my blog to get ideas and products for your class. Archives
December 2016
Categories
All
© Mackenzie Allen 2016.
ALL RIGHTS RESERVED. |
 RSS Feed
